


14 years ago
Monday, January 31, 2011
And the Winner Is....
The winner of the Robotz Cricut Cartridge and companion folders is Lisa of Lisa's Paper Butterflies. CONGRATULATIONS LISA!!!
Friday, January 28, 2011
ScrapbookPal Blog Hop - January 28 - 30

Here is your chance to win another Cricut Cartridge. Read the bottom of this post to find out how you can win the Robotz Cartridge and Robotz Companion Folders from me personally.
Here's how to play:
Start at the ScrapbookPal.com blog and become a follower (if you aren't already). Visit each of the design team blogs below and leave a comment on their blog in their post regarding the blog hop. When you've done this on all the blogs, go to the ScrapbookPal.com blog, leave a comment UNDER THIS POST stating that you have completed the hop. You can also become a follower of each of the designer's blogs but it is not a requirement to win.
ScrapbookPal (http://scrapbookpal.blogspot.com/)
TomiAnn (http://tomiannie.blogspot.com/)
Tammy (http://theeventqueen.blogspot.com/)
Amy (http://www.scrappingmommy.com/)
Cheryl (http://sweeetdesignsbycheryl.blogspot.com/)
Jamie (http://jamielanedesigns.blogspot.com/)
Crystal (http://crystalscraftycreations.blogspot.com/)
Leah (http://paperblossoms.blogspot.com/)
ScrapbookPal (http://scrapbookpal.blogspot.com/)
You have until 11:59 PM MST on Sunday January 30th to participate and get your name in the drawing to win a Cricut cartridge of your choice from ScrapbookPal.com. Have fun!!
Here is the project I created using the new Disney Classics Cricut Cartridge. I just love this cart!! Brings back so many wonderful memories of going to Disney World in Florida when I was kid and a more recent trip with my wonderful sister-in-law who is also my best-est friend!!
In hopes of another trip soon, I have decided to create a Disney Autograph/Photograph 8x8 album. I want to have it done so that this album is ready to go by the time we have a trip planned. Here is the first page which is a Alice In Wonderland page. I cut Alice at 6". Some of the pieces were very small (the eyes and lips especially) so I used a white opaque pen, markers and rhinestones in place of them. Stay tuned to my blog as I will post more photos of this album as I complete the pages.


Here is your chance to win the Robotz Cricut Cartridge and the Companion Folders. IT'S OFFICIAL - 100 FOLLOWERS!! PARTY! This means I will be giving away the Robotz cartridge and matching companion folders after the blog hop ends!!
The cartridge was used twice for Design Team Projects. To win the cartridge, you must be a follower of my blog. Once I reach 100 followers, I will do a drawing of all my followers and then contact the winner so I can ship the cartridge. I will also include the Robotz Companion Folders if I reach 100 followers by the end of the Valentine's Day blog hop (11:59 pm Sunday, Jan 30. That's it! Just become a follower to win!!
Wednesday, January 26, 2011
Join us for the ScrapbookPal Valentine's Day Blog Hop
Saturday, January 22, 2011
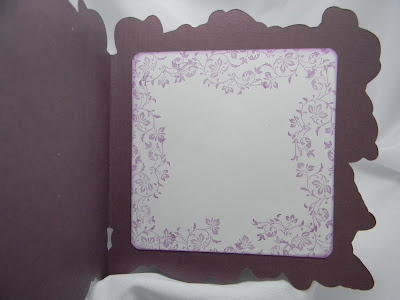
Paper Lace Card for Collector's Cut Challenge
For Challenge #2 over at The Collector's Cut, I drew the Paper Lace Cartridge. It is a brand new cartridge I just added to my collection and it is an AWESOME cart! I made 2 of the same card (I usually never think far enough ahead to cut things twice). One I'm sending to a friend who recently lost her husband. I hope it lifts her spirits a bit.


Monday, January 17, 2011
Apples of My Eye - Layout for Scrapbook Pal Design Team
Have you set any crafting/scrapping resolutions/goals for the new year? I set 2 crafting/scrapping goals. Goal #1 is to start working on my Ancestry album. Goal 2 is to start working on my family albums. I've gotten started on both goals and this week's post helps me with Goal #2. Something about the Country Life Cricut Cartridge just makes me think of apples so my 2nd layout using this cart has an apple theme and this one focuses around my kids who are The Apples of My Eye. They would probably argue that the dog should have been on this page and they would have been right!
I hope you enjoy this layout!


This is how I made this 2-page layout, feel free to change it up to suit your needs and style.
Ingredients:
Country Life Cricut Cartridge
2-3 Sheets 12x12 Brown Cardstock (3rd sheet can be 8.5 x 11)
2 Sheets 12x12 Red Plaid Cardstock
1 Sheet Red Cardstock
1 Sheet ivory/tan Cardstock
1 Sheet green cardstock
1 Sheet navy blue Cardstock
Sakura Glaze Pen - White
Rhinestones
ATG or Other Roll Adhesive
Tim Holtz Ionic Craft Pick/Paper Piercer
Thin twine or string
Pop Up Glue Dots
Instructions:
On your Cricut, using the Country Life Cartridge, cut 3 apples (p. 53) at 5" including the layers. The base layer is brown which is the stem of the apple and the seeds on the right side apple. This is kind of hard to see in the handbook if your eyes are bad like mine.
Press Shift Font, then spell out the letters to make the words "the apples of my eye" at 2" and cut on navy blue card stock. Press Shift Banner and the next to last button on the bottom row and cut 8 on red and 8 on green cardstock. This banner shape (scalloped triangle) actually appears several times on the cartridge so feel free to use a different button. Alternate the letters "The Apples of My Eye" on to the red and green scalloped triangles and adhere. Using the Ionic Paper Piercer, punch very small holes in the upper corners of the banner pieces. Cut 2 pieces of string approximately 15" long. Run strings through holes to form assembled banner (you will actually have 2 banners, one with The Apples and the other with Of My Eye). Apply pop up glue dots to the back of each triangle.
Cut 3 - 3.5 x 1.25" rectangles out of brown cardstock. Cut 3 - 3.25 x 1 rectangles out of navy blue cardstock. Adhere navy blue rectangle on top of brown rectangle, centered for even margins. Write names of children and birthdates on each using a white Sakura Glaze Pen.
Trim the red plaid cardstock to 11x11. Adhere to brown cardstock, centering on paper for even margins.
Add the banner to the top of each page. Place apples as desired, be sure to leave room for the brown/blue rectangles, and adhere both. For a little pop, I added a rhinestone swirl on the left page. I also used the white Sakura Glaze Pen to add some doodle dots to the apples and leaves.
To make the pictures fit on the apples, I cut the red apple layer just slightly smaller and then used it to trace out the shape onto my pictures and then I handcut them and adhered to the apple on the left.
Saturday, January 15, 2011
Birthday Card for My Daddy and Collector's Cut Post
My dad's birthday is coming up on the 19th so I wanted to make a card for him. I also need to use the Sentimentals cart that I pulled last week for the Collector's Cut, so this card kills 2 birds with one stone. I hope you like this card! Be sure to stop by the Collector's Cut blog so you can see more projects made for their first challenge.


Wednesday, January 5, 2011
I Confess - I'm A Collector!!
Yep it's confession time! I'm a collector of Cricut Cartridges and paper stacks, oh and stickles, and embellishments, and stamps, oh and ribbon too. I probably have enough paper to wallpaper my entire house and probably yours too!! I have so many embellishments but never seem to have what I want or need when I'm in the middle of a project so I go buy more only to find out that I already had those very same embellishments in a drawer.
So how many Cricut cartridges have you purchased or been given that you've never really used. I'm sad to say that of my now 67 carts (gasp!!) a large number fall into that category. So many of these cartridges I wanted so bad, had a project in mind for them even, yet once they arrived I was just too busy to use them. So I am playing along with the gals over at The Collector's Cut blog and am going to start using my carts more often. The challenge is simple: USE YOUR CRICUT CARTRIDGES!! Basically you select a cartridge (I wrote all mine down on popsicle sticks and will then draw one from a jar) and use it for a project, layout, card, home decor, whatever you want, just use it. Then post photos on your blog (or facebook) if you have one. Once you have used that cartridge, then you draw another from the jar. For me, most likely if I draw a font cartridge I will draw another cartridge to work with too.
I'm hoping that not only will I use my cartridges more often, I will also build up a stack of general all occasion, birthday and even Christmas cards and tags. This should help me use up some of my paper and ribbon in the process. Wish me luck!!
Saturday, January 1, 2011
Down on the Farm Layout for ScrapbookPal.com Design Team
This week's post is really about making do with what you have. I am enjoying the holidays in Missouri this year, with my parents and my in-laws. I've been having a wonderful time visiting with family and friends but there hasn't been much time for crafting. This week's project was particularly challenging because while my mom does have a cricut she has basically no supplies so I had to work with what she had. I finally found some coordinating papers and came up with this cute Down on the Farm layout using the new Country Life Cricut Cartridge. I have to tell you, this could be one of my favorite new cartridges! I seem to say that about all the cartridges I get, but this one is just even more adorable!! It is also on sale right now at ScrapbookPal.com for $29.99!!


I found 2 -12x12 matching light blue sheets of cardstock for the base. I then found 1 - 12x12 sheet of red cardstock and some bits and pieces of other colors. When I found the apple cardstock, I knew exactly what I was going to do for this project. I had to be very careful not to make any mistakes as I did not have much paper to work with.
Using the Country Life Cricut Cartridge, I cut the barn (p 58) at 6.5" tall including all the layers and then cut extra fence layers at the same height on brown. If I had access to all my supplies, I would have used a brown Color Box Cat's Eye on the edges of the barn and then used a White Sakura Gelly Roll Pen to make doodle dots on the barn, hills and photo mats. For the hills, I used a green textured cardstock and handcut the hills. If I would have had access to a Warm Green Color Box Fluid Chalk Cat's Eye, I would have rubbed it on the edges of the hills to make them stand out and then used Pop Up Glue Dots on the the middle hill.
I cut the words Down on the Farm (p.58 using Phrase Button and Shift Phrase) at 2" on white, then cut the words Down Farm on green at 3". Normally you would not change the size, but I liked the look it gave me so I cut out "on the" from the welded phrase and used them separately. The windmill (p 63) was cut at 6" on a light gray cardstock and then I used a silver metallic marker to color it in to make it look more like metal.
I cut 2 photo mats on the red cardstock at 4" and 2 at 3". Then I cut 2 mats on the apple cardstock at 3.75" and 2 at 2.75" I adhered the apple mats to the red mats using a Scrapbook Adhesives EZ Tape Runner. I then used the tape runner and a liquid glue to adhere all of the parts to the blue base cardstock.
Subscribe to:
Posts (Atom)
