


13 years ago
Saturday, November 27, 2010
ScapbookPal Blog Hop - December 3 - 5
Join us December 3 - 5 for the ScrapbookPal.com Design Team Blog Hop! Participate in the hop and you are eligible to win a Cricut cartridge of your choice (including the newest releases) from ScrapbookPal.com!!
Here's how to play:
Start at the ScrapbookPal.com blog, become a follower. Visit each of the design team blogs below and leave a comment on their blog in their post regarding the blog hop. When you've done this on all the blogs, go to the ScrapbookPal.com blog, leave a comment stating that you have completed the hop. You can also become a follower of each of the designer's blogs but it is not a requirement to win.
Here are the blogs you will be visiting:
ScrapbookPal Blog (http://www.scrapbookpal.blogspot.com/)
Jamie Cripps (http://jamielanedesigns.blogspot.com/)
Rowena Valentine (http://www.creativegenealogyscrapbooking.com/)
Crystal Butler (http://crystalscraftycreations.blogspot.com/)
Amy Crockett (http://www.scrappingmommy.com/)
Tammy White (http://theeventqueen.blogspot.com/)
Leah Cornelius(http://paperblossoms.blogspot.com/)
Tomi Ann Hill (http://tomiannie.blogspot.com/)
Cheryl Walker (http://sweeetdesignsbycheryl.blogspot.com/)
ScrapbookPal Blog (http://www.scrapbookpal.blogspot.com/)
Thursday, November 18, 2010
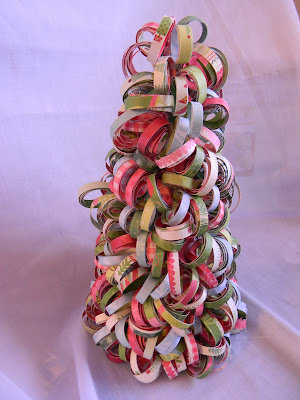
Christmas Tree
Warning - Daphne if you are reading this, close this window now!! Do NOT Look!!!!!
After my success with the wreath (see post immediately below this one), I thought I would try this method on the paper mache cone tree shape you can get at Michael's or Hobby Lobby. I used the 10" cone. I did cut these papers at 1/4" wide. I don't think 1/2" wide would have worked well on this size project.


After my success with the wreath (see post immediately below this one), I thought I would try this method on the paper mache cone tree shape you can get at Michael's or Hobby Lobby. I used the 10" cone. I did cut these papers at 1/4" wide. I don't think 1/2" wide would have worked well on this size project.


Christmas Wreath
Warning - Daphne if you are reading this, close this window immediately! Do NOT look!!!
Here is a wreath I made for my partner in the swap I am hosting on the Cricut.com message board. Here is a link to the tutorial for this wreath. I made one change, I used 1/2" strips rather than 1/4" and glad I did. I used hot glue and came away with several burns but it was worth it for the way it turned out.
I am heading out of town for a couple days but on Sunday I will try to do a video tutorial on the wreath. If I can't get a video to work, I will at least do a photo tutorial. I actually just packed the cardstock and my paper cutter to go with me so I can cut and roll the strips while in my hotel room.


Sunday, November 14, 2010
Christmas Layout using Joys of the Season
This is a layout I created for the ScrapbookPal.com design team. I just love the Joys of the Season cartridge I got from ScrapbookPal! I also seem to have a thing for layouts with hidden tags for photos as this is the 2nd one in 2 months that I've created this way. This post is pretty photo intensive but I wanted to share all the details.
This is the 2 page layout - the silver star is metal and does not bend to put in the book. Oops! Can you tell how often I scrapbook??!!

The Left Side - note the gold string at the edge of the tree


The top of the window sill pulls up to reveal a photo mat tag

Remember the gold string? It pulls out to reveal an ornament tag

The ornament tag opens to reveal more places for photos

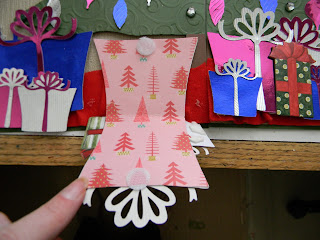
And the large blue present with the silver ribbon...

Pulls open to reveal photo mats
The Right Side - note the gold string at the edge of the tree...


With room for more photos

See the candle on top of the fire place? Pull it out...
 To reveal another photo mat tag

Use 2 12" x 12" pieces of green cardstock as your base for your pages. Select 2 designer papers to serve as your wall paper cutting them at 11 7/8" wide x 6.25" tall and adhere to your green cardstock leaving no green paper showing on the interior edges of your layout meaning that you will have the green cardstock showing only on the top, bottom and left edge of the left page and the top, bottom and right edge of the right page. I used wallpaper from wallpaper sample books which adds a very nice texture. Adhere a ribbon over the seams to hide them.
Using the Joys of the Season cartridge, I cut the Christmas Tree using the Shadow Button (CrsmsTre Shadow - p. 59) at 11.5". Then I took my paper cutter and cut the tree down the middle. Using the D'vine Swirls Embossing folder and my Cuttlebug, I embossed both pieces of the tree. Because it is so tall, I had to run it through 3 times lining up the edges as best I could to emboss the whole tree. I then cut a piece of brown cardstock about 2" x 3" for the tree trunk and then cut it in half. This will mostly be covered by your presents. Apply Pop-Up Glue Dots to the back of the tree, allowing plenty of room for your ornaments to slide in from the sides. Adhere right up to the interior edges of the pages (see photo 1 above).
I cut 2 Ornaments (using Shift and Ornament Button p. 79) at 3.75" on a metallic cardstock. For the pink ornament, I cut the Bulb1 (using Shift and Ornament Button p. 62) and then ran it face down through my 5" Xyron Sticker maker and then applied glitter to it. For the blue ornament, I cut the Star (Angel with Shift p. 53) at 2.5". Adhere to the front of your ornaments. To make the interior photo mats, using Design Studio software I flipped the image and recut on the same metallic cardstock. If you don't have Design Studio, put your paper face down on the mat and then cut out the image. This will help ensure the mats match up when you put it inside your original cut. If you use double-sided paper you will skip the step of making the interior photo mats. Score the ornaments down the middle and fold in half. Adhere the photo mats inside your ornaments. Tie gold cording to the holes in the top of the ornaments. Slide under the tree.
For the ornaments on the tree, I cut ornaments in a variety of sizes on the metallic cardstock and then adhered them to the tree randomly. For the top of the tree, my metal star obviously is not going to work in an album so cut a star in silver metallic cardstock and cut in half and apply to each side of the tree. Note to self, metal does not bend!!
The Soldier (p. 58) was cut at 5.5" on skin tone paper, and then the layers on red and black (Soldier using Layers Button) - do not change the size. Adhere the layers together. Cut the bear (same page just use Shift) at 4.5" on brown and then his face parts on tan (using Shift and Layers Button) without changing the size. I ran the bear face down through my 5" Xyron and then flocked him with brown flock. I also ran the face through my Xyron face down and applied tan flock. Adhere the layers together. Adhere to left page of layout.
For the presents (p. 56), I cut Gift1 and Gift2 (using Shift) at 1.5" and 2.25" on the metallic cardstock I used for the ornaments. Then cut the ribbon (Gift1 using Layers Button) on the metallic cardstock and adhered to the presents. For the Present with the photo mat, I welded 2 of Gift1 (using Shift) together and cut at 2.25". Then I flipped the images and cut the photo mat. Adhere the layers together. To keep the photo mat closed, I added a small velcro dot to each side. Place a scrap of red fabric to the bottom of the tree on each side to serve as your tree skirt and then place the presents on top of the tree skirt. Use Pop-Up Glue Dots to raise some of the presents up and give dimension to your layout. I also used a few chipboard presents I had from another project for more color.
For the fireplace (p.55), I used Design Studio to make it 6.75" wide by 5.5" tall. I cut the base on dark brown and then used darker brown ink and ran it along the edges and then heavily over the mantle area. I cut the inside layer (using Layer Button) on metallic black cardstock and then again in brown for the wood and yellow for the fire. If you have Design Studio, you can use the Hide Contour feature so you aren't wasting paper. Run a red ink pad over the edges of the yellow cardstock to make it appear more like fire. Adhere the layers together. For the background of the fire pit area, I had a scrap piece of red crackled-looking paper and used a black ink pad to make it appear like soot and glued it to the back of the fireplace. Use Pop-Up Glue dots only along the left, right and bottom edges of the fireplace and adhere to the right page of your layout. Remember that you will be sliding a photo mat behind the fireplace so you need to keep the top and center free of adhesives.
Cut the candle twice (Fireplace using Shift p.55) on red cardstock at 1.75". Cut the layers (using Shift and Layers Button) in green and silver cardstock. Apply the layers. Because the holly berries cut so small at this size I used Christmas Red Stickles for the berries. For the hidden tag, cut a tag that will fit behind your fireplace when it is glued down. My tag was 5" x 5". Then using a designer paper, cut a photo mat to fit on the tag. I used a Ticket Punch corner chomper to give detail to my mat and then adhere together. Now you are going to attach the photo mat to your candle. Take a matching scrap piece of paper (about 1" wide and 2" long) and fold in half. Adhere it to the photo mat on both the front and back side using a good adhesive. Place additional adhesive on both sides of this tag. Take the candle and add pop-up glue dots to the back of one. Place the candles so that the scrap piece of tag is sticking in between the 2 candle layers and adhere together. This way you can use the candle to pull up the photo mat.
Cut the wreath (Wreather 1 using Shift p. 66) on green cardstock at 2.75" and use Christmas Red Stickles to make the holly berries. Adhere above the fireplace. Cut 3 stockings (p. 54) on red at 2" and then the layer (using Layer button) on white. I ran these pieces face down through my Xyron 150 Sticker Maker and then applied red and white flock to the appropriate pieces. Adhere the layers and then adhere to fireplace. Use rhinestones to create a garland between the stockings.
For the window, I took a piece of white paper approx 4" wide by 3.75" tall and cut out 4 squares to make it appear like the window had 4 panes. I used a Stampin' Up paper punch on the bottom of the window sill to give it decoration. For the "outside", I took a piece of dark blue paper cut slightly less than 4" by 7.5" and scored it across the middle. Then using a Sakura Stardust Gelly Roll pen I made stars on the front of the folded piece of paper. I made the illusion of snow by tearing a scrap piece of white paper and then applying Icicle Stickles (let dry!). Adhere the white "snow" to the bottom of the front of the dark blue paper and then adhere both to the back of the window frame. Now your window should flip up to reveal the photo mats. Cut designer paper to make photos mats and adhere to the dark blue paper. For the hidden tag, take a piece of white paper approximately 4" wide x 3.75" long and use the same paper punch on the top to make it match the bottom of the window. Cut designer paper to fit the photo mat (below the punch area - see picture above). You are going to use pop up glue dots to attach the window to your layout so you will need to trim the side of your photo mat approximately .75" on each side so it can slide in. Don't trim it all the way up though, you want the top to be the same length as the window. For added stability, I used a scrap piece of white paper and the punch to make another piece of the window border and trimmed it to fit and adhered it over the first piece being sure to line them up.
Add embellishments like rhinestones to your tree and wherever else you desire. This layout did take some time but most of it was spent in figuring out what I wanted to do rather than actually doing it!
I hope you enjoy it!
This is the 2 page layout - the silver star is metal and does not bend to put in the book. Oops! Can you tell how often I scrapbook??!!

The Left Side - note the gold string at the edge of the tree

The Window lifts up to reveal 2 photo mats


Remember the gold string? It pulls out to reveal an ornament tag

The ornament tag opens to reveal more places for photos

And the large blue present with the silver ribbon...

Pulls open to reveal photo mats

The Right Side - note the gold string at the edge of the tree...

Pulls out to reveal a blue star ornament tag...

With room for more photos

See the candle on top of the fire place? Pull it out...

Use 2 12" x 12" pieces of green cardstock as your base for your pages. Select 2 designer papers to serve as your wall paper cutting them at 11 7/8" wide x 6.25" tall and adhere to your green cardstock leaving no green paper showing on the interior edges of your layout meaning that you will have the green cardstock showing only on the top, bottom and left edge of the left page and the top, bottom and right edge of the right page. I used wallpaper from wallpaper sample books which adds a very nice texture. Adhere a ribbon over the seams to hide them.
Using the Joys of the Season cartridge, I cut the Christmas Tree using the Shadow Button (CrsmsTre Shadow - p. 59) at 11.5". Then I took my paper cutter and cut the tree down the middle. Using the D'vine Swirls Embossing folder and my Cuttlebug, I embossed both pieces of the tree. Because it is so tall, I had to run it through 3 times lining up the edges as best I could to emboss the whole tree. I then cut a piece of brown cardstock about 2" x 3" for the tree trunk and then cut it in half. This will mostly be covered by your presents. Apply Pop-Up Glue Dots to the back of the tree, allowing plenty of room for your ornaments to slide in from the sides. Adhere right up to the interior edges of the pages (see photo 1 above).
I cut 2 Ornaments (using Shift and Ornament Button p. 79) at 3.75" on a metallic cardstock. For the pink ornament, I cut the Bulb1 (using Shift and Ornament Button p. 62) and then ran it face down through my 5" Xyron Sticker maker and then applied glitter to it. For the blue ornament, I cut the Star (Angel with Shift p. 53) at 2.5". Adhere to the front of your ornaments. To make the interior photo mats, using Design Studio software I flipped the image and recut on the same metallic cardstock. If you don't have Design Studio, put your paper face down on the mat and then cut out the image. This will help ensure the mats match up when you put it inside your original cut. If you use double-sided paper you will skip the step of making the interior photo mats. Score the ornaments down the middle and fold in half. Adhere the photo mats inside your ornaments. Tie gold cording to the holes in the top of the ornaments. Slide under the tree.
For the ornaments on the tree, I cut ornaments in a variety of sizes on the metallic cardstock and then adhered them to the tree randomly. For the top of the tree, my metal star obviously is not going to work in an album so cut a star in silver metallic cardstock and cut in half and apply to each side of the tree. Note to self, metal does not bend!!
The Soldier (p. 58) was cut at 5.5" on skin tone paper, and then the layers on red and black (Soldier using Layers Button) - do not change the size. Adhere the layers together. Cut the bear (same page just use Shift) at 4.5" on brown and then his face parts on tan (using Shift and Layers Button) without changing the size. I ran the bear face down through my 5" Xyron and then flocked him with brown flock. I also ran the face through my Xyron face down and applied tan flock. Adhere the layers together. Adhere to left page of layout.
For the presents (p. 56), I cut Gift1 and Gift2 (using Shift) at 1.5" and 2.25" on the metallic cardstock I used for the ornaments. Then cut the ribbon (Gift1 using Layers Button) on the metallic cardstock and adhered to the presents. For the Present with the photo mat, I welded 2 of Gift1 (using Shift) together and cut at 2.25". Then I flipped the images and cut the photo mat. Adhere the layers together. To keep the photo mat closed, I added a small velcro dot to each side. Place a scrap of red fabric to the bottom of the tree on each side to serve as your tree skirt and then place the presents on top of the tree skirt. Use Pop-Up Glue Dots to raise some of the presents up and give dimension to your layout. I also used a few chipboard presents I had from another project for more color.
For the fireplace (p.55), I used Design Studio to make it 6.75" wide by 5.5" tall. I cut the base on dark brown and then used darker brown ink and ran it along the edges and then heavily over the mantle area. I cut the inside layer (using Layer Button) on metallic black cardstock and then again in brown for the wood and yellow for the fire. If you have Design Studio, you can use the Hide Contour feature so you aren't wasting paper. Run a red ink pad over the edges of the yellow cardstock to make it appear more like fire. Adhere the layers together. For the background of the fire pit area, I had a scrap piece of red crackled-looking paper and used a black ink pad to make it appear like soot and glued it to the back of the fireplace. Use Pop-Up Glue dots only along the left, right and bottom edges of the fireplace and adhere to the right page of your layout. Remember that you will be sliding a photo mat behind the fireplace so you need to keep the top and center free of adhesives.
Cut the candle twice (Fireplace using Shift p.55) on red cardstock at 1.75". Cut the layers (using Shift and Layers Button) in green and silver cardstock. Apply the layers. Because the holly berries cut so small at this size I used Christmas Red Stickles for the berries. For the hidden tag, cut a tag that will fit behind your fireplace when it is glued down. My tag was 5" x 5". Then using a designer paper, cut a photo mat to fit on the tag. I used a Ticket Punch corner chomper to give detail to my mat and then adhere together. Now you are going to attach the photo mat to your candle. Take a matching scrap piece of paper (about 1" wide and 2" long) and fold in half. Adhere it to the photo mat on both the front and back side using a good adhesive. Place additional adhesive on both sides of this tag. Take the candle and add pop-up glue dots to the back of one. Place the candles so that the scrap piece of tag is sticking in between the 2 candle layers and adhere together. This way you can use the candle to pull up the photo mat.
Cut the wreath (Wreather 1 using Shift p. 66) on green cardstock at 2.75" and use Christmas Red Stickles to make the holly berries. Adhere above the fireplace. Cut 3 stockings (p. 54) on red at 2" and then the layer (using Layer button) on white. I ran these pieces face down through my Xyron 150 Sticker Maker and then applied red and white flock to the appropriate pieces. Adhere the layers and then adhere to fireplace. Use rhinestones to create a garland between the stockings.
For the window, I took a piece of white paper approx 4" wide by 3.75" tall and cut out 4 squares to make it appear like the window had 4 panes. I used a Stampin' Up paper punch on the bottom of the window sill to give it decoration. For the "outside", I took a piece of dark blue paper cut slightly less than 4" by 7.5" and scored it across the middle. Then using a Sakura Stardust Gelly Roll pen I made stars on the front of the folded piece of paper. I made the illusion of snow by tearing a scrap piece of white paper and then applying Icicle Stickles (let dry!). Adhere the white "snow" to the bottom of the front of the dark blue paper and then adhere both to the back of the window frame. Now your window should flip up to reveal the photo mats. Cut designer paper to make photos mats and adhere to the dark blue paper. For the hidden tag, take a piece of white paper approximately 4" wide x 3.75" long and use the same paper punch on the top to make it match the bottom of the window. Cut designer paper to fit the photo mat (below the punch area - see picture above). You are going to use pop up glue dots to attach the window to your layout so you will need to trim the side of your photo mat approximately .75" on each side so it can slide in. Don't trim it all the way up though, you want the top to be the same length as the window. For added stability, I used a scrap piece of white paper and the punch to make another piece of the window border and trimmed it to fit and adhered it over the first piece being sure to line them up.
Add embellishments like rhinestones to your tree and wherever else you desire. This layout did take some time but most of it was spent in figuring out what I wanted to do rather than actually doing it!
I hope you enjoy it!
Stamping Up! Special Sign Up Offer!!!!
The promotion we’ve been waiting for is finally here! Stampin’ Up! has announced that starting Monday (tomorrow), November 15th, you can sign up to be a demonstrator for only $87.50!!! That is 50% off!! Half price!! The regular price is $175 and the starter kit value is $310. Plus it is customizable and you can choose exactly what you want to receive! I have attached the promotion flyer, the Standard Starter Kit form and the Digital Starter kit form so you can see exactly what you get. And finally, the Starter Kit ships FREE…no shipping costs!
This is a great time to get a new business started. With the upcoming holidays, the stamping and sharing opportunities are easy!
IT is also THE PERFECT OPPORTUNITY FOR A HOBBY STAMPER! The starter kit is not only a fantastic savings, it includes the benefits and discounts of being a Stampin' Up! demonstrator with no obligation to sell.
LOVE THE IDEA OF STAMPIN' UP! AS A BUSINESS? Based on my experience and success, I'm ready to personally help you design a business plan and develop your Stampin' Up! career.
Here are a few details:
Available Nov. 15 thru Nov. 30!
- Take 30% off your first $150 Stampin' Up! product order (placed w/in 45 days).
- Save 20% on all other orders
- Pre-order from the 2011 Occasions Mini and Sale-A-Bration catalogs starting Dec. 1.
- Sale-A-Bration is around the corner and free stamp set opportunities multiply!
- Enjoy tons of learning tools, including video tutorials on the Stampin' Up! demo site.
- Sign up on line and enjoy instant benefits (starting Nov. 15th). Go to http://tammywhite.stampinup.net Click on Start Your Own Business, and the password is Tammysdemo or contact me at tammy@iplanitmeetings.com.
IT'S GOOD TO KNOW: There's no penalty to drop and you keep the kit and everything you purchased at a discount! You'll enjoy full demonstrator privileges thru March 31, 2011. To remain active beyond March 31, 2011, $300 in product sales is required.
Monday, November 8, 2010
ScrapbookPal Design Team Blog Hop - Save the Dates
SAVE THE DATES - ScrapbookPal.com will be hosting a blog hop on December 3-5 featuring projects created by the Design Team. There will be a prize for participating in the hop - a Cricut Cartridge of your choice!! So put the dates on your calendar and come back December 3 - 5 to see all the wonderful creations!! See you then!!
In The Mood
I am so in the mood for Christmas this year. Not for the snow and the cold weather, we are having an awesome fall with unseasonably warm temps and beautiful days, but just for decorating, making cards, and the like. So you may notice that I have changed my blog background (again) and it is a Winter Theme. I am fighting the urge (and my husband if I tried) to pull out the Christmas decorations, I just don't know that I can wait until Thanksgiving!!! Anyone else in the mood this year??
Monday, November 1, 2010
Joys of the Season Polar Bear Card - ScrapbookPal Design Team Post
ScrapbookPal.com sent me the Joys of the Season Cricut Cart for November. It is one of my favorite holiday carts and the polar bear is one of my favorite cuts. Here is the card I made using the bear. I hope you enjoy it!


Ingredients:
Joys of the Season Cricut Cartridge
Blue cardstock
White cardstock
Snowflake stamp
Light Blue ink pad
Waterfall and Icicle Stickles
Swiss Dots Cuttlebug A2 Embossing Folder
Labels One Nestabilites Die Set (Largest label)
Rhinestones
Adhesive
Pop-Up Glue Dots
Scor-Pal
Xyron 150 Sticker Maker
Recipe:
Cut blue cardstock 5" tall by 12" wide. Score at 3" and 9" using Scor-Pal. This becomes the base of your card.
Cut 2 pieces of white cardstock 4 7/8" tall x 2 7/8" wide. Adhere to front panels of card leaving about 1/16" of blue showing on all sides. Randomly stamp icicles in blue on the cardstock. Use Waterfall Stickles to highlight a couple of the icicles. Let dry!
Using the largest nestability from the Labels 1 Die Set, cut 1 on blue cardstock. Apply thin line of Icicle stickles around edge. Let dry!!
Cut Polar Bear Shadow (p.52) at 2.5" on blue. Also cut the scarf (Polar Bear Layers) on blue. Don't change the size.
Cut Polar Bear at 2.5" on white. Emboss in Cuttlebug using Swiss Dots Embossing Folder.
Adhere white bear to the shadow bear and then add scarf. What is a polar bear without bling, add 3 diamond rhinestones to his scarf.
Using pop-up glue dots, adhere bear to the blue nestability label. Using pop-up glue dots. adhere this to just the left side of the card. This will allow the card to open from the right side.
Cut Merry Christmas (p. 75) at 2.5" on white. Run through your Xyron X to make into a sticker and apply to inside middle section of the card. For some bling, use Icicle Stickles on the letters and LET DRY!!
Subscribe to:
Posts (Atom)
