Tuesday, December 28, 2010

Happy Holidays!

I hope everyone had a very Merry Christmas, Happy Hanukkah, Happy Boxing Day, Happy Kwanzaa, or whatever holiday you may celebrate.  I had a very wonderful Christmas in Missouri with my parents and am now at my in-laws (which is a good thing as I have great in-laws) until the weekend.  I got 4 of the Wal-Mart Lite Cricut Cartridges for Christmas and can't wait to get home to play with them.  I also got a mandolin which I am even more excited about.  I have not played a musical instrument since the 5th grade and man is it obvious!  But I'm trying anyway!! 

I got the Country Life Cartridge from ScrapbookPal.com for my January DT projects and I have to tell you that it is one CA-UTE cartridge.  I can't wait until you see the layout I created with it.  For once it does not have any hidden picture mats! 

Well just wanted to wish everyone safe and Happy Holidays!!  Catch you in the new year!

Friday, December 17, 2010

Christmas Village for ScrapbookPal.com Design Team

This new Christmas Village Cricut Cartridge is just so cute! I am going to be traveling for the holidays and did not want to pull out all of my decorations since I would not be home to enjoy them so this cart came in handy. I now have a village that will be much easier to pack away after the holidays. The picture quality isn't great because the village is too big to fit into my photo box so I apologize for that. I hope you enjoy it!


Using the new seasonal Christmas Village Cricut Cartridge I got from ScrapbookPal.com, I cut the 5 buildings (first 5 buttons on top row of the keypad) at 11.5" on designer cardstock. Using Design Studio, I used "hide contours" to hide the cut lines for the doors and windows and cut the houses again on black (no lights on) and yellow (lights on). The benefit to this is that it made the houses much more sturdy. I then hand cut out some solid cardstock to make the shutters and doors. I added some premade embellishments I had left over from other projects. I used Liquid Applique (heated with heat gun) on the roof tops to give the appearance of snow.

I cut the Christmas tree (3rd row, 3rd button) at 11.5" on dark green cardstock twice and then layer the 2 pieces together to give it more stability. I then handcut the trunk area in brown but you could easily recut on your Cricut and just trim to use only the trunk. I also hand cut the star on metallic gold paper. I used rhinestones and Liquid Applique (heated with glue gun) to decorate.

The carolers and ice skaters (2nd row, buttons 5-10) at 3" on black cardstock. I decided to leave these plain as a contrast to the buildings.

The fence (4th row, 8th button) was cut at 2" using the Real Dial Size button. The fence is one of the few pieces that is actually sized proportionately. So if you don't use the Real Dial Size button, you have to cut it at 7" to get a fence that was about 2" high otherwise you get a fence that is about 1/2" tall. Again, I applied Liquid Applique (heated with heat gun) to the top of the fence.

The snowman (3rd row, 2nd button) was cut at 5" on white cardstock. I used Black Diamond and Orange Peel Stickles and Vintage Photo Distress Stickles to embellish him.

This really is a pretty easy project to do with lots of impact because of it's size. It only took me 2-3 hours to complete this project.

Tuesday, December 14, 2010

My First Blog Award - Stylish Blogger Award

I am so very stinkin' excited!!  I received my very first Blog Award today!  Hugh thanks and hugs to Angela from My Paper Passion for giving me the Stylish Blogger Award! So very sweet of her!  THANK YOU Angela!!!

Stylish Blogger Award

Now that I have this, I need to do 4 things:
1). Thank and link back to the person who awarded me
2). Share 8 things about myself
3). Pay it forward to 8 bloggers that I have recently discovered
4). Contact those bloggers and tell them about their awards


OK, here are 8 things I will share about myself 
  1. I am a wife and mother.
  2. I have a beautiful 18 year old daughter who is attending the Aveda Institute in Denver.  She is just starting the 2nd of 9 phases but I'm proof positive that when it comes to foils she does an incredible job! She is loving Aveda and I'm so proud of how well she is doing!!
  3. I have twin 9 year old sons who are in the 4th grade.  They are just the sweetest, most polite kids (I know I might be a little biased).
  4. I own a meeting planning and online registration company and get to work out of my home.
  5. I am getting a mandolin for Christmas and can't wait to start practicing!!  My poor neighbors!!
  6. I am passionate about genealogy (family history research) and have been doing that for about 10 years.
  7. Genealogy led me into my love of paper crafts!  I had planned on doing my ancestry albums when I first got my Cricut 2 years ago and haven't done one yet!  I can't stop crafting long enough to get started.
  8. My resolutions for 2011 are to officially start my Ancestry albums and to practice on the mandolin every day.
I’m going to pay this award forward to some special Bloggers that inspire me every day. This was so hard because there are so many talented people out there but here are some of my favorites in no particular order:

Jessica at From J's Corner
Lisa at Bug Junkie

I hope that you can check out all of these blogs to see for yourself why I like them!

Sunday, December 12, 2010

Painted Item for Partner in Swap

Here is the item I made for my partner in my swap on the Cricut.com messageboard.  The theme for this day was "Painted Item" so I painted a paper mache box that looked like a book, added some gold accents to look like pages (sorry did not get a photo of that side) and then I mod podged my favorite Graphic 45 paper (Christmas Past Deluxe) to the front.  My thought for this was that she could keep pictures, mementos or cards she has received in the box.  I hope she likes it!!


Tags I Made for My Swap Partner

Here are some tags I made for my swap partner on the Cricut.com messageboard.  She really likes mice so the mice ones are digis that I just added some stickles and ribbon too.  The others are ones I made.

I hope you enjoy them!


Friday, December 3, 2010

ScrapbookPal Blog Hop - Win a Cricut Cartridge!!

It's time for the ScrapbookPal.com Design Team Blog Hop!  Participate in the hop and you are eligible to win a Cricut cartridge of your choice (including the newest releases) from the in stock cartridges at ScrapbookPal.com!!

Here's how to play:
Start at the ScrapbookPal.com blog and become a follower (if you aren't already).  Visit each of the design team blogs below and leave a comment on their blog in their post regarding the blog hop.  When you've done this on all the blogs, go to the ScrapbookPal.com blog, leave a comment UNDER THE BLOG HOP POST stating that you have completed the hop.  You can also become a follower of each of the designer's blogs but it is not a requirement to win. I hope you will consider becoming a follower of my blog.

ScrapbookPal Blog
Jamie Cripps
Crystal Butler
Amy Crockett
Tammy White (You are here)
Leah Cornelius (Your next stop)
Tomi Ann Hill
Cheryl Walker
ScrapbookPal Blog

You have until 11:59 PM MST on Sunday December 5th to participate and get your name in the drawing to win a Cricut cartridge of your choice from ScrapbookPal.com.  Have fun!!

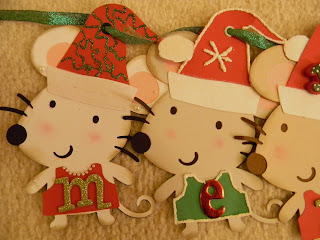
My post for the Blog Hop is a banner I created for a friend who LOVES mice.  We are talking over the moon for mice (not real ones though).  So I thought she would get a kick out of a banner of mice!!  I apologize for the coloring in some of the pictures.  The banner is too long to fit in my photo box so I had to take it in the hall on the carpet.  Instructions are provided below the pictures.  Click on a picture to enlarge.


Add some close ups:


I cut the mouse and layers (p. 37) from Create A Critter Cricut cartridge at 5.5" and assembled the layers.  Then I cut the Santa Hat and the layer (p. 47) from Joys of the Season cartridge at 3".  I used Design Studio to cut the shirt (p. 50) from Everyday Paper Dolls cartridge at 1.25" using the Real Dial Size and then stretched it to fit across the belly of the mouse.  I adhered the hat and the shirt to the mice and then used Thickers Alphabet Stickers to spell out "Merry Chrismouse".  Then just embellished with stickles, Liquid Applique, brads, rhinestones, Colorbox Fluid chalk cat's eye ink pads on the edges, Doodlebug Designs Crushed Velvet Flock (I used Lady Bug and Lily White), and a little pink chalk to create cheekbones.  I used my Crop A Dile II Big Bite to add the large eyelets for the holes for the ribbon so the hats would not tear.  If I had enough matching eyelets, I would have done 2 eyelets in each hat to help the mice lay flat. I may have to go back and add these before I mail it!!  I hope you enjoy.

Be sure to leave a comment IN THIS POST and then continue on to the next designer in the blog hop.  When done, be sure to go back to the Scrapbookpal blog and post a comment.  Be sure to provide an email address so they can contact you if you win!!  Good Luck!!

Wednesday, December 1, 2010

Caroling Stair Step Card with Christmas Village Cartridge - ScrapbookPal Design Team

I love the new Christmas Village Cartridge I received from ScrapbookPal.com in our Design Team package this month.  I also love Stair Step cards and thought it would be fun to use with the silhouettes on this cartridge.


Ingredients:
Navy Blue Cardstock
Black Cardstock
Forest Green Cardstock
Scrap of Brown Cardstock
Scrap of Yellow Cardstock
Zing Embossing Powder - Silver Metallic Finish
Snow-Tex
Diamond Dust

Recipe:
Cut white cardstock at 6.5"wide.  You need 1 piece at approximately 1.25" tall, another at 1.5" tall and another at 2" tall.  Tear the top edges to give uneven appearance similar to what you might get from real snow.  Apply thick layer of Snow-Tex over the entire front of each piece.  Sprinkle Diamond Dust on the Snow-Tex to give it some sparkle and shine.


Cut navy blue cardstock at 10.5" x 6.5" and another piece at 5.5" x 6.5".  Score the 10.5" x 6.5" navy cardstock at the following measurements: 1.25", 2.5", 4.5", 6", and 8.25". Fold in a double "Z" shape (see picture below).


On the 5.5" x 6.5" navy cardstock, stamp with background stamp (I used a star background stamp) using the clear embossing ink pad. Pour Zing Silver Metallic Finish embossing powder of the card stock and then shake off the excess powder.  Pour excess back into jar.  Use embossing gun to heat embossing powder til it turns shiny silver.


Using the Christmas Village Cricut Cartridge, cut 3-4 buildings (row 1 on keypad) at 3" on black cardstock.  Adhere 3 of the buildings together to form a row of houses.  Then adhere scrap yellow cardstock behind the windows to make it appear as if there are lights on in the houses.  Apply Snowtex along the roof lines of the houses.  Cut 3 caroler silhouettes (row 2) at 3.5" on black cardstock.  Highlight edges of the carolers withColorBox MetaleXtra Pigment Cat's Eye Inkpad - Pearl Gray.  Cut 1 tree (row 3) at 3.5" and another at 3.75" on forest green cardstock.  Hand cut a small piece of brown cardstock to serve as the tree trunk for each tree and adhere.  Apply Snowtex along the edges of the trees.

Adhere the stamped navy cardstock to the last "front" of the Z fold.  Only apply adhesive to the lower 2".  Determine how much of the buildings you want to show and adhere them  to the back of the card then adhere the 2" Snow-tex covered strip. Make sure that you cannot see the edge of the buildings behind the snow  Determine how much of the Carolers you want visible behind the snow and adhere them to the middle Z.  Then adhere the 1.5" Snow-Tex covered strip.  Adhere the trees to the front of the strip using a liquid adhesive. Adhere the 1.25" Snow-Tex covered strip to the front Z-fold.

Wrap the navy blue ribbon around the front of the first Z fold (over the Snow-Tex strip) and adhere with glue dots to the back.  Cut out a shape (I used the Decorative Label Punch from Stampin Up) in Navy Blue.  Stamp Christmas greeting (I used "Oh Christmas Tree" from TPC Studios Christmas Greeting Clear Stamp set) on embossing ink pad and then cover with Zing Silver Metallic Finish Embossing Powder.  Use embossing heat gun to heat powder until it turns shiny silver.  Rub edge of punched/cut shape with ColorBox MetaleXtra Pigment Cat's Eye Inkpad - Pearl Gray and adhere to ribbon with glue dots.


Because this gets to be a rather heavy card with all the Snow-Tex, I cut some short strips of cardstock (about 2" by .5") and folded and adhered on the backside of the Z folds to keep the card from sliding down (see picture below).