This is the 2 page layout - the silver star is metal and does not bend to put in the book. Oops! Can you tell how often I scrapbook??!!
The Left Side - note the gold string at the edge of the tree
The Window lifts up to reveal 2 photo mats
Remember the gold string? It pulls out to reveal an ornament tag
The ornament tag opens to reveal more places for photos
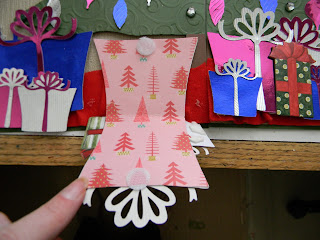
And the large blue present with the silver ribbon...
Pulls open to reveal photo mats
The Right Side - note the gold string at the edge of the tree...
Pulls out to reveal a blue star ornament tag...
With room for more photos
See the candle on top of the fire place? Pull it out...
To reveal another photo mat tag

Use 2 12" x 12" pieces of green cardstock as your base for your pages. Select 2 designer papers to serve as your wall paper cutting them at 11 7/8" wide x 6.25" tall and adhere to your green cardstock leaving no green paper showing on the interior edges of your layout meaning that you will have the green cardstock showing only on the top, bottom and left edge of the left page and the top, bottom and right edge of the right page. I used wallpaper from wallpaper sample books which adds a very nice texture. Adhere a ribbon over the seams to hide them.
Using the Joys of the Season cartridge, I cut the Christmas Tree using the Shadow Button (CrsmsTre Shadow - p. 59) at 11.5". Then I took my paper cutter and cut the tree down the middle. Using the D'vine Swirls Embossing folder and my Cuttlebug, I embossed both pieces of the tree. Because it is so tall, I had to run it through 3 times lining up the edges as best I could to emboss the whole tree. I then cut a piece of brown cardstock about 2" x 3" for the tree trunk and then cut it in half. This will mostly be covered by your presents. Apply Pop-Up Glue Dots to the back of the tree, allowing plenty of room for your ornaments to slide in from the sides. Adhere right up to the interior edges of the pages (see photo 1 above).
I cut 2 Ornaments (using Shift and Ornament Button p. 79) at 3.75" on a metallic cardstock. For the pink ornament, I cut the Bulb1 (using Shift and Ornament Button p. 62) and then ran it face down through my 5" Xyron Sticker maker and then applied glitter to it. For the blue ornament, I cut the Star (Angel with Shift p. 53) at 2.5". Adhere to the front of your ornaments. To make the interior photo mats, using Design Studio software I flipped the image and recut on the same metallic cardstock. If you don't have Design Studio, put your paper face down on the mat and then cut out the image. This will help ensure the mats match up when you put it inside your original cut. If you use double-sided paper you will skip the step of making the interior photo mats. Score the ornaments down the middle and fold in half. Adhere the photo mats inside your ornaments. Tie gold cording to the holes in the top of the ornaments. Slide under the tree.
For the ornaments on the tree, I cut ornaments in a variety of sizes on the metallic cardstock and then adhered them to the tree randomly. For the top of the tree, my metal star obviously is not going to work in an album so cut a star in silver metallic cardstock and cut in half and apply to each side of the tree. Note to self, metal does not bend!!
The Soldier (p. 58) was cut at 5.5" on skin tone paper, and then the layers on red and black (Soldier using Layers Button) - do not change the size. Adhere the layers together. Cut the bear (same page just use Shift) at 4.5" on brown and then his face parts on tan (using Shift and Layers Button) without changing the size. I ran the bear face down through my 5" Xyron and then flocked him with brown flock. I also ran the face through my Xyron face down and applied tan flock. Adhere the layers together. Adhere to left page of layout.
For the presents (p. 56), I cut Gift1 and Gift2 (using Shift) at 1.5" and 2.25" on the metallic cardstock I used for the ornaments. Then cut the ribbon (Gift1 using Layers Button) on the metallic cardstock and adhered to the presents. For the Present with the photo mat, I welded 2 of Gift1 (using Shift) together and cut at 2.25". Then I flipped the images and cut the photo mat. Adhere the layers together. To keep the photo mat closed, I added a small velcro dot to each side. Place a scrap of red fabric to the bottom of the tree on each side to serve as your tree skirt and then place the presents on top of the tree skirt. Use Pop-Up Glue Dots to raise some of the presents up and give dimension to your layout. I also used a few chipboard presents I had from another project for more color.
For the fireplace (p.55), I used Design Studio to make it 6.75" wide by 5.5" tall. I cut the base on dark brown and then used darker brown ink and ran it along the edges and then heavily over the mantle area. I cut the inside layer (using Layer Button) on metallic black cardstock and then again in brown for the wood and yellow for the fire. If you have Design Studio, you can use the Hide Contour feature so you aren't wasting paper. Run a red ink pad over the edges of the yellow cardstock to make it appear more like fire. Adhere the layers together. For the background of the fire pit area, I had a scrap piece of red crackled-looking paper and used a black ink pad to make it appear like soot and glued it to the back of the fireplace. Use Pop-Up Glue dots only along the left, right and bottom edges of the fireplace and adhere to the right page of your layout. Remember that you will be sliding a photo mat behind the fireplace so you need to keep the top and center free of adhesives.
Cut the candle twice (Fireplace using Shift p.55) on red cardstock at 1.75". Cut the layers (using Shift and Layers Button) in green and silver cardstock. Apply the layers. Because the holly berries cut so small at this size I used Christmas Red Stickles for the berries. For the hidden tag, cut a tag that will fit behind your fireplace when it is glued down. My tag was 5" x 5". Then using a designer paper, cut a photo mat to fit on the tag. I used a Ticket Punch corner chomper to give detail to my mat and then adhere together. Now you are going to attach the photo mat to your candle. Take a matching scrap piece of paper (about 1" wide and 2" long) and fold in half. Adhere it to the photo mat on both the front and back side using a good adhesive. Place additional adhesive on both sides of this tag. Take the candle and add pop-up glue dots to the back of one. Place the candles so that the scrap piece of tag is sticking in between the 2 candle layers and adhere together. This way you can use the candle to pull up the photo mat.
Cut the wreath (Wreather 1 using Shift p. 66) on green cardstock at 2.75" and use Christmas Red Stickles to make the holly berries. Adhere above the fireplace. Cut 3 stockings (p. 54) on red at 2" and then the layer (using Layer button) on white. I ran these pieces face down through my Xyron 150 Sticker Maker and then applied red and white flock to the appropriate pieces. Adhere the layers and then adhere to fireplace. Use rhinestones to create a garland between the stockings.
For the window, I took a piece of white paper approx 4" wide by 3.75" tall and cut out 4 squares to make it appear like the window had 4 panes. I used a Stampin' Up paper punch on the bottom of the window sill to give it decoration. For the "outside", I took a piece of dark blue paper cut slightly less than 4" by 7.5" and scored it across the middle. Then using a Sakura Stardust Gelly Roll pen I made stars on the front of the folded piece of paper. I made the illusion of snow by tearing a scrap piece of white paper and then applying Icicle Stickles (let dry!). Adhere the white "snow" to the bottom of the front of the dark blue paper and then adhere both to the back of the window frame. Now your window should flip up to reveal the photo mats. Cut designer paper to make photos mats and adhere to the dark blue paper. For the hidden tag, take a piece of white paper approximately 4" wide x 3.75" long and use the same paper punch on the top to make it match the bottom of the window. Cut designer paper to fit the photo mat (below the punch area - see picture above). You are going to use pop up glue dots to attach the window to your layout so you will need to trim the side of your photo mat approximately .75" on each side so it can slide in. Don't trim it all the way up though, you want the top to be the same length as the window. For added stability, I used a scrap piece of white paper and the punch to make another piece of the window border and trimmed it to fit and adhered it over the first piece being sure to line them up.
Add embellishments like rhinestones to your tree and wherever else you desire. This layout did take some time but most of it was spent in figuring out what I wanted to do rather than actually doing it!
I hope you enjoy it!


No comments:
Post a Comment