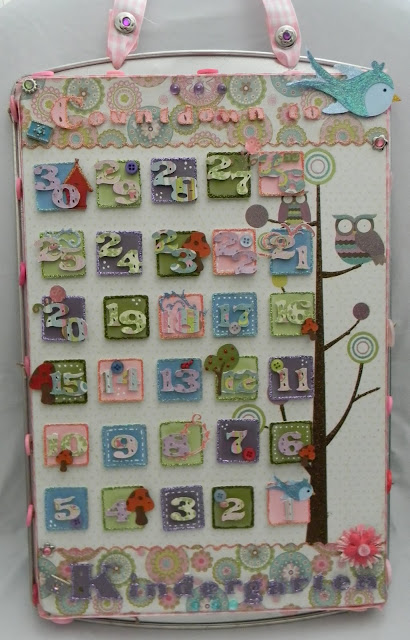
This is my Cindy Loo Project entry for the www.scrapbookpal.com Design Team. Be sure to visit the Design Team blog for more fabulous projects and cards from some incredible designers!!
I made this Countdown to Kindergarten Cookie Sheet for a friend who's daughter will be starting Kindergarten this fall. The Cindy Loo cartridge is so perfect for this project. I hope my friend and her daughter will love it as much as I enjoyed making it for her.
Ingredients:
Cindy Loo Cricut Cartridge
1 15 x 10 Cookie Sheet
1 piece each of 5 colors of cardstock
1 piece 12 x 12 Designer cardstock
1 piece 6 x 12 Designer cardstock
Various coordinating scrap pieces of Designer cardstock/paper
1 piece chipboard approx 8 x 10 (back of paper stacks works well too)
30 small magnets
Scallop edge punch
Gesso (optional)
Yes Paste or Mod Podge
Pop Up Glue Dots
Tombo Mono Aqua Adhesive
Coordinating ribbon (wide enough to cover edge of cookie sheet and serve as hanger)
Stickles to coordinate with cardstock
Sakura Gelly Roll Pen - Stardust
Embellishments like Buttons, Flowers, Skittles, Stickles, Ribbon
Recipe:
From Cindy Loo Cart:
Cut 30 of Doily1 Shadow on chipboard at 1.25" tall
Cut 6 of Doily1 Shadow from each color of cardstock (total of 30) at 1.25" tall
Cut numbers 1-30 using Font Layer button from coordinating scrap pieces of DSP. (Using DesignStudio, I cut at a height of .650". If you do not use DesignStudio, cut at .75" tall)
Cut your choice of images/flourishes with appropriate layers from cartridge in varying heights (My tallest was the tree at 1.5" tall).
Cut letters "Countdown to" using Font Layer button on 1 sheet of cardstock. (Using DesignStudio, I cut at at height of approx. .863. Without DesignStudio cut at approx 1").
Cut letters "Kindergarten" using Font Layer button on 1 sheet of cardstock. (Using Design Studio, I cut at height of approx. 1.391". Without DesignStudio cut at 1.5").
Using Tombo Mono Adhesive, adhere the cardstock cuts of Doily1 to the chipboard cuts making sure to match edges as much as possible. Using coordinating stickles, outline the edges of each square.
Using Tombo Mono Adhesive, assemble and adhere the layers of images/florishes. Use stickles, gelly roll pens, markers etc to decorate and add dimension to cuts. Adhere to Doily1 squares.
Using Pop Up Glue Dots, adhere the numbers 1-30 to the Doily1 squares. Use gelly roll pens, Sakura White Souffle Pen, buttons, flowers, etc to decorate squares.
Adhere magnets to the back of the squares using hot glue or Glossy Accents. Do not use glue dots as the magnets are more likely to separate from the paper when removed from the cookie sheet.
Use coordinating stickles and outline letters "Countdown to Kindergarten".
Optional Step:
Apply Gesso to backside of cookie sheet. I do this to help the paper adhere as Gesso gives it some texture. Let dry.
Lay 12 x 12 Designer cardstock on cookie sheet and determine how much overhang is needed to be able to fold over on sides and touch or nearly touch the flange, cut off leftover. Fold paper over edge of tray. I used my ScorPal to create straight fold lines. You do not have to be perfect as you will use ribbon to cover edges.
Apply mod podge or Yes Paste (my preference) to back of DSP and adhere to cookie sheet being sure to smooth out any bubbles.
Cut 6" x 12 Designer cardstock in half to create 2 - 3" x 12" strips. Use scallop edge punch along 1 long edge of both pieces. Place on cookie sheet with scallop edge facing in and determine how much overhang is needed to fold over the edge. I used my Scor-Pal and scored along long side (opposite of scallop edge) of each piece of cardstock to make a nice fold. I also used the ScorPal for the side edges too.
Apply mod podge or Yes Paste to back of each piece of cardstock. Adhere the strips to top and bottom of the cookie sheet. Fold the edges of one side under the other to make nice corner creases.
Use stickles to decorate the scalloped edges of the designer cardstock. Apply adhesive to the back of the ribbon and apply ribbon along the edge of the cookie sheet to give nice finish to edges.
Use Crop-A-Dile Big Bite to punch 2 holes along top edge flange for ribbon to serve as the hanger. Add ribbon and secure with brads, eyelets, adhesive or simply tie a knot on each side.
Adhere buttons to side of tray on top of ribbon using glue dots or liquid adhesive. Decorate front of cookie sheet with flowers, brads, ribbon, skittle, etc. The sky's the limit.
13 years ago


3 comments:
This is wonderful Tammy! They will LOVE it!!!
I LOVE this!
Adorable!!! There is no other word!
Post a Comment